Featured

Stand Up Donuts

I had a lunch date set up with a 44 year old man ladyboi today who proceeded to not call, text, or anything remotely human. I wasn’t upset with him flaking out (I kind of expect it out of men in the 21st century). I was pissed off that he didn’t bother to respect me enough to call with a lame excuse. Plus he had been asking me out for near (nigh?) on a year. His loss. One strike rule. 

I consider the 21st century to be the Age of Communication. It isn’t hard to text or call. Sheesh.

In my pissiness I immediately began searching Pinterest for donut recipes. I wanted to jam to Jezabel while whisking my dang dough and work out my angst. It didn’t help that I had just returned from a $240 oil change either. They replaced a leaking fuel pump pressure regulator which was leaking gas all over a coil which could cause a spark. Thanks to the guys at RoadMart for always giving me excellent service. 

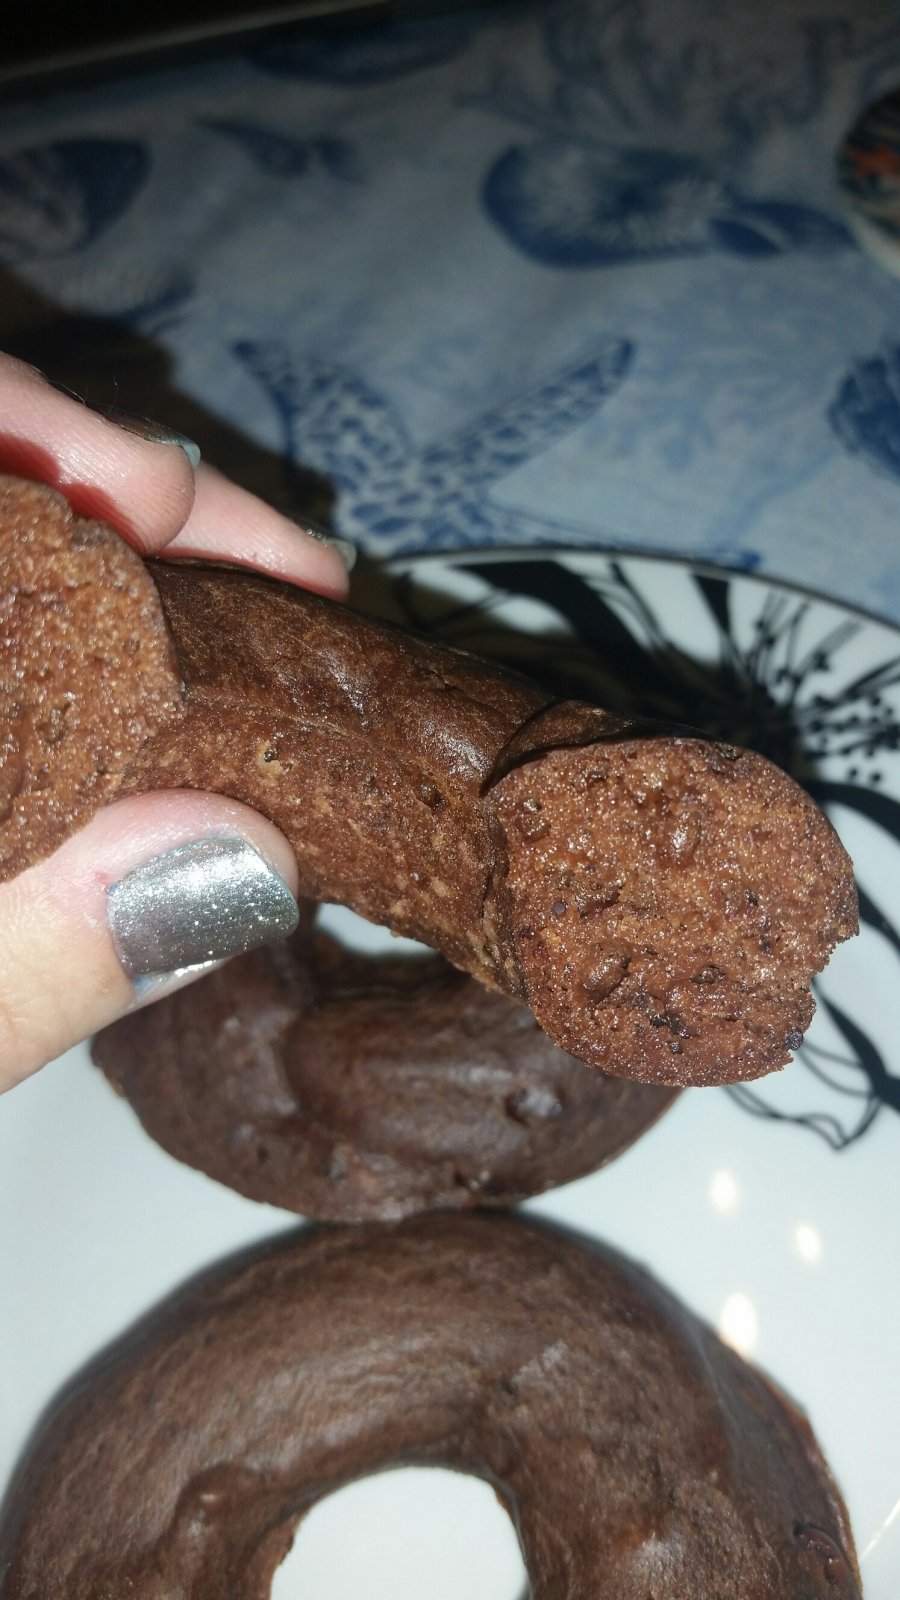
I found a fabulous donut recipe to use in my Wilton donut pans. The basic recipe is one I’ll be able to rework and turn into other amazing creations.

My best friend Diane mentioned I should start a new blog for my cooking and other odds and ends. I used to have one for trucking, but I grew bored with it. So here ya go, Di! 

I used this recipe from Brooklyn Farm Girl and absolutely fell in love with it. I ate so many donuts I was barely able to finish my beer. I know, right?!

INGREDIENTS: 

1/4 c vegetable oil
1/2 c buttermilk
2 eggs
3/4 c granulated sugar
(1/4 c granulated sugar separate for coating the donuts)
1/2 tsp salt
1 tsp baking powder
1/2 tsp vanilla
1 c all purpose flour

Grease donut pan (I use the Baker’s Joy spray with the blue cap)

Mix all ingredients sans flour until combined.

Stir in flour mixture 1/3 at a time until smooth.

Fill pans 3/4 and bake at 350 degrees for 15 minutes.

*the donuts may look undercooked, but do the toothpick test.

Let them sit for about 5 minutes then roll each donut in sugar until coated. Eat immediately or store appropriately.

What I love so much about these donuts is that they aren’t overly cake-like which I personally hate. They have a very good texture and are kind of spongey without the pound cake density. I hope I’m making sense. 

I really recommend this recipe. I doubled the batch. Why did I double it the first time I tried it? I figured if it was gonna suck I’ll make sure it will suck double time. LOL Yeah, I know. 

Before I say happy baking to you, dear reader, I named this blog what I would if I had an actual storefront. (Dreamin….) I have a beagle-coonhound called Belly who is a sweetheart of a princess, and also rides with me on the truck. She cleans my floors for me as I drop things. What a goil! 

Roll Tide Dispatcher

I have been at my company for five years with the same dispatcher. For the past year since I bought my house I have been bringing in treats for him. I enjoy baking and often only want 1-2 out of a dozen. I think there may have been one time I brought in meatballs…hmm.

Loving this new no chill sugar cookie recipe I came across last month, I decided to make a batch and decorate them. The meringue powder from Wilton has been on my want list for awhile. I bought a tub to try my hand at royal icing and was quite pleased.

Royal icing is the hard, crunchy icing you find on sugar cookies. It is the icing you see on elaborately decorated cookies. 

The meringue powder takes the place of egg whites so you don’t ingest raw eggs. Normally I wouldn’t have a problem with that, however, knowing what I do of corporate poultry farms I can’t do it. Especially taking into consideration I used to drive a reefer (refrigerated trailer) and often made pick ups at Tyson farms. Unless you raise your own chickens don’t eat raw eggs. Ok I’m done. 

My dispatcher (and I) are both Alabama fans. Think Roll Tide Roll and Crimson Tide.  

Deciding on white and crimson, I set up my decorating bags and went to work. This was my second attempt to decorate cookies. My first ended up in the trash. The entire 2 dozen including all that frosting. Like 3 cups worth. It was rough. 

This time was a tad easier. I ate the ugly ones. 

Not too shabby? I’ll get better as I get used to working with royal icing.  

One trick I found was when I flooded the cookie with the fill in color, I needed to immediately use the other flood color to make a design. The icing develops a skin on it very quick and so you need to work quickly. That’s how I did the polka dots and other designs without it looking clunky. I learned the hard way when I made an ugly cookie. 

I was also able to use my new little stander upper caddy thingy. It’s also by Wilton (one of my favorite companies). It holds 6 bags of icing as well as flower nails. 

For the icing I used the Wilton Color Right system utilizing the crimson drops. I think I counted out about 20 drops to get the rich color. I love that system. All the Wilton colors are worth getting because they’re rich with no aftertaste. 

Either way, I’ll be all set when my family comes to visit over Thanksgiving and we can decorate Xmas cookies. Until then I’ll keep baking and trying new holiday recipes. I’d love to impress them. 😉 

Saved by the Glaze

I’m sitting here watching Hellraiser IV waiting on my laundry to finish. Exciting right? In a whim I decided to make donuts to take on the road with me. 

I have two of the Wilton donut pans which yields 12 donuts. I highly recommend the pans. They’re awesome.  

Via Pinterest, as usual, I came across a glazed chocolate donut recipe that looked delicious. I did the recipe verbatim and was out of milk, so I omitted the glaze. I figured a donut full of mini chocolate chips would be fabulous. Instead, I found the donut to be quite bland. The texture was wonderful, not dense like a typical cake donut. 

*they look greasy as I greased the pan with Baker’s Joy. It’s a flour based baking spray I love. 

I ended up whipping up a small glaze consisting of powdered sugar and water. What a difference that made. The donuts are absolutely delicious now. LOL I realized it is because the recipe lacks sugar except for the 1/4 cup mini chocolate chips. 

But geez…that initial bite. What a letdown.

I’ll make these again, but will always use the glaze. They’re quick to make and bake. I love recipes like that. 

I need to mess around with the recipe to make it sweeter. 

Baking Fool

I took a vacation and stopped by to see family on my way back south (aka where life is normal). Since I’ve been back I have been baking and cooking up a storm. 

I got home late Thursday night and ran out to my beloved Winn Dixie Friday morning. My kitchen was nearly devoid of fresh food and my freezer was particularly empty of meat. Sigh. Taking advantage of the Labor Day sales I stocked up. 

I made a nice pork Boston butt roast Friday afternoon. I made a glaze of olive oil, brown sugar, and minced garlic for it. Slow cooking it at 300 for just over 2 hours made it a nice medium rare. I’ve been eating on it throughout the weekend. The dog has been helping.

Fried yellow squash is thing I really like and rarely make. I decided to spice it up for something different. I mixed 1 egg with 1 cup buttermilk, then 1 cup flour with some salt and chili powder. I dumped those in as I usually do. The squash turned out fantastic. 

At home, I always tend to wash my dinner down with some wine. My typical choice is Barefoot”s Sweet Red Blend.

Aside from that and the bbq chicken I made, I commenced on making funfetti cupcakes with hot pink frosting thanks to Pillsbury. I found it buried in my cupboard. 

I also made freezer corn for the first time. The ol Winn Dixie had a 10/$3 deal and, as a trucker who’s rarely home, I had to take advantage. I blanched them for 6 minutes then plunged them in my sink in cold water. Since my ice maker has been broken I had to rely on the cold water out of my fridge. I forgot to buy ice. LOL 

Once they were cooled, drained, and dried I wrapped each cob in cellophane before putting them in a gallon zip loc. I don’t even know how to properly thaw them, so I will simply throw them in a pot of boiling water and then eat em. 

My mom had sent me home with a carton full of items. I found photo albums and my grandma’s recipe box (Dad’s mom). I haven’t even gone through the rest of it yet. I found Grandma’s recipe for Shortenin’ Bread and decided to try it.

The recipe is this:

1/2 c butter (I used unsalted)
1/4 c lighy brown sugar packed lightly
1 1/2 c all purpose flour

In a medium bowl cream together the butter and sugar. Add flour and mix thoroughly – dough will be crumbly. Roll or pat out to 1/2″ thick on slightly floured surface. Cut into squares of desires size and bake at 350 for 20 minutes, or until they are lightly browned on the edges.

I found that 1/2″ is too thick as I used a cookie cutter for fun. Theyre good, but too crumbly. I recommend 1/4″ thick which is what I plan to do next time.

My mom had given me a brand new Pampered Chef pastry mat. It is one of those that is made out of silicone and can roll up. I had been going on for months about how I wanted to learn to make a pie crust from scratch. My goal was to use lard, but I never did buy the organic leaf lard like I intended. Instead I ended up using shortening, but it was still tasty. 

I found that the Betty Crocker pie recipe works pretty darn well. I plan on sticking with that one, but will be trying others. It made me so mad on my umpteenth time of rolling out the crust that I called upon all the grandmas of the world to help. LOL 

I made sure everything, including the rolling pin, was floured. Yet the flour on the rolling pin couldn’t stop the dang dough from sticking to it and ruining my crust. In the end, I managed to get the crust in the pie dish. I had to use some extra dough to bring the edges up which meant I didn’t have enough dough to do a lattice design. I ended up using a heart shaped cookie cutter and kind of covered the top. 

I followed the Betty Crocker recipe for the apple filling using granny smith apples. They were perfectly tart. 

I won’t be putting the recipes down as the Betty Crocker recipes are easily found. 

However, this is my pitiful before picture: 

And here is the after:

It was particularly tasty (whew, thank God) especially with a large dollop of my homemade cool whip on it.

Homemade Cool Whip:

1/4 c cold water
1 tsp unflavored gelatin (Knox)
1/2 tsp cream of tartar
1 3/4 c whipping cream
3 tbsp sugar
1 tsp vanilla

Pour water into a small saucepan. Sprinkle the gelatin over water and let sit 2-3 minutes. Place pan over med-low heat and stir until gelatin dissolves. Remove from heat and cool completely.

Once cool, pour in bowl with whipping cream, sugar, and cream of tartar. Beat on medium until it begins to thicken. Add vanilla and continue to beat until it becomes the consistency of cool whip.

Keep refrigerated. Can be frozen.